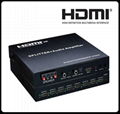
| Model: | HS010450S |
|---|---|
| Brand: | - |
| Origin: | - |
| Category: | Consumer Electronics & Lighting / Other Consumer Electronics |
| Label: | HDMI cat5e Splitter , HDMI1.4 Splitter , Splitter with extend |
| Price: |
-
|
| Min. Order: | - |
Product Description
1x4 HDMI1.4 Splitter Over 50M CAT5e/6 Cable Extender
I. Introduction
The Splitter is a product for splitting and extending your HDMI signal over long distances to a compatible display.
It is designed to convert the HDMI signal and transmit by CAT5E/6 cable. It also supports Transferring Bidirectional
Infrared control signal together with the HDMI signal, so you can control the Source in the Sink side which is 50 meters
outside, also you can control the Sink in the Source side which is 50 meters outside using the Splitter.
II. Features
1. Compliant with HDMI1.3, HDCP 1.2 and DVI 1.0.
2. Full HD support: 1080p@60Hz@24 bit/pixels.
3. HDMI local loop out for HDMI input.
4. Supports LPCM 7.1CH, Dolby True HD, and DTS-HD Master Audio.
5. Operates for TMDS clock frequencies up to 165MHz.
6. Use single CAT-5E/6 cable to substitute HDMI cable to achieve long distances transmission.
7. UTP cable termination follows the standard of IEEE-568B.
8. Supports EDID control via EDID selector.
9. Transfer Bidirectional Infrared control signal together with the HDMI signal.
III. Package
1. HDMI Splitter ------------------------------------------------------- 1PCS
2. Receiver ------------------------------------------------------------- 4PCS
3. Wideband IR Tx ---------------------------------------------------- 4PCS
4. Wideband IR Rx ---------------------------------------------------- 4PCS
5. 12V2.5A DC Power Supply adapter ---------------------------- 1PCS
6. 5V1A DC Power Supply adapter -------------------------------- 4PCS
7. Operation Manual ------------------------------------------------- 1PCS
IV. Specifications
1.Frequency Bandwidth 1.65Gbps
2.HDMI Splitter Input/Output Ports 2x HDMI Female port/4 x CAT6(1x4)
1x IR Transmitter/1x IR Receiver
3.Receiver Input/Output Ports 1 x HDMI Female port/1 x CAT6
1x IR Transmitter/1x IR Receiver
4.Power Supply HDMI Splitter DC 12V 2.5A
Receiver DC 5V 1A
5.ESD Protection Human Body Model: ± 8kV (air-gap discharge)
± 4kV (contact discharge)
6.Dimensions (mm) Transmitter: 118(W) X 250 (D) X 32(H)
Receiver: 49(W) X 81 (D) X 25 (H)
7.Weight Transmitter: 750g
Receiver: 150g
8.Operating Temperature 0°C ~ 40°C / 32°F ~ 104°F
9.Operating Temperature 0°C ~ 40°C / 32°F ~ 104°F
10.Storage Temperature -20°C ~ 60°C / -4°F ~ 140°F
11.Relative Humidity 20 ~ 90% RH (Non-condensing)
12.Power Consumption (Max) Transmitter 12W
Receiver 1.5W
V. Operation controls and Functions
Transmitter :
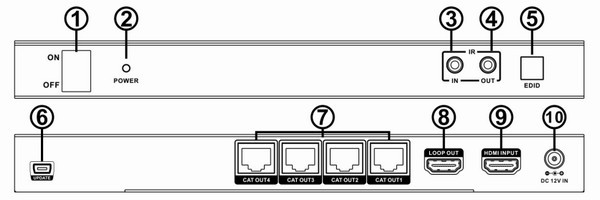
1.POWER SWITCH: Power ONOFF Switch.
2.POWER LED: This red LED illuminate when the device is connected with power supply.
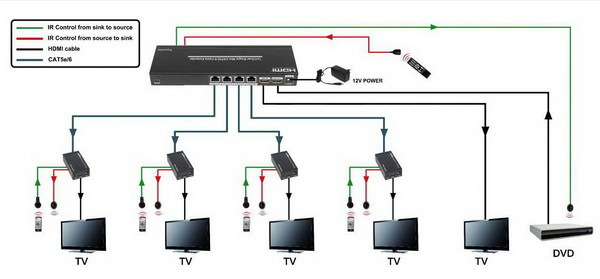
3.IR IN: IR Control System over CAT5e/6 Cable IR Receiver. Source to SINK, plug Wideband IR Rx into this unit.
4.IR OUT: IR Control System over CAT5e/6 Cable IR Transmitter. SINK to Source, plug Wideband IR Tx into this unit.
5.EDID Selector: Select output signal format via EDID Selector.
See the EDID description .
6.UPDATE: System software update.
7.OUTPUT Area: RJ45 Jacks provide signal output.
8.HDMI LOOP OUT: Local HDMI loop output port.
9.HDMI INPUT: HDMI Input port. Connect source with HDMI cable.
10.DC IN: Plug the 12V2.5A DC power supply into the unit.
Receiver:

1. CAT6:Connect the CAT input of the receiver with the CAT output of the transmitter with CAT5E/6 cable.
2. EQ Selector: Equalizer selector.See the EQ description.
3. LOCK LED: This red LED will illuminate when the Splitter and Receiver is connected with CAT5e/6 cable.
4. HDMI OUT: HDMI Output port. Connect to TV with HDMI cable.
5. DC IN: Plug the 5V1A DC power supply into the unit.
6. IR RX: IR Control System Over CAT5e/6 Cable IR Receiver. SINK to Source, plug Wideband IR Rx into this unit.
7. IR TX: IR Control System Over CAT5e/6 Cable IR Transmitter. Source to SINK, plug Wideband IR Tx into this unit.
TX EDID Description
Under normal circumstances, a source device (digital and analog) will require information about a connected
device/display to assess what resolutions and features are available. The source can then cater its output to
send only resolutions and features that are compatible with the attached device/display. This information is called
EDID (Extended Display Information Data) and a source device can only accept and read one EDID from a connected
device/display. Likewise, the source can only output one resolution for use by a connected device/display.The EDID
switch allows for EDID learning or to pre-set an EDID to encourage a “handshake” between the display and source.
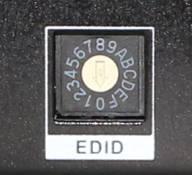 Attention: Please confirm the extender is working normally, when you want to modify the new EDID to source, Toggle
the EDID switcher to the corresponding number first, then plug the Transmitter power again. The extender will send the
new EDID to source.
EDID TABLE:
Position EDID Description
0 1080p,
1 1080p, DOLBY/DTS
2 1080p, HD AUDIO
3 1080i, 2CH AUDIO
4 1080i, DOLBY/DTS 5.1
5 1080i, HD AUDIO
6 3D,1080p, 2CH AUDIO
7 3D, 1080p,DOLBY/DTS 5.1
8 3D,1080p, HD AUDIO
9 Copy the HDMI loopt out EDID
A 1080p, 2CH AUDIO
B 1080p, 2CH AUDIO
C 1080p, 2CH AUDIO
D 1080p, 2CH AUDIO
E 1080p, 2CH AUDIO
F 1080p, 2CH AUDIO
RX Equalizer Description
Recommended EQ setting
Position Cable Length
0 (MIN)-2 under 15m (49.5ft)
3-4 15-30m (49.5 ft - 99ft)
5-6 30-40m (99ft - 132ft)
7 (MAX)40-50m(132ft – 164ft)
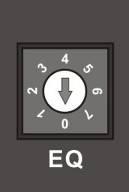
If you see flickering or blinking image on the display, adjust the EQ switch to improve the cable skew. MAX stands for the strongest HDMI signal level for the longest possible transmission length while MIN stands for the weakest HDMI signal level for short transmission length. Adjust the signal level from MIN to MAX until desired video quality is displayed.
CONNECT AND OPERATE
1. Connect a source such as a Blu-Ray Player, game console, A/V Receiver, Cable or Satellite Receiver, etc. to the HDMI input on the Transmitting unit.
2. Connect a display such as an HDTV or HD Projector to the HDMI output on every Receiving unit.
3. Connect single Cat5e/6 up to 164ft/50m to the output of the Transmitting unit, and the other end to the input of the every Receiving unit.
4. For power, plug both the Transmitting unit and Receiving unit with the included power supplies.
5. Power on each device in the same sequence (receiver and transmitter will already be powered when either unit is pl ed in.)
At this point the display connected should display the source signal connected to the extender set. If no signal is displayed, check the receiver EQ switcher. If a display is having difficulty receiving a signal, see EDID section and perform EDID learning or access the display’s menu and adjust the resolution (lowest to highest until signal is displayed). A 24 Hz vertical refresh rate may work better than 60 Hz or higher. Use the source remote at the receiver emitter to test IR functionality. If the IR remote function is not responding, check the emitters to ensure they are placed correctly and are pl ed into the correct IR jacks on the Extender set receiving and transmitting units.
Wideband IR(30KHz---60KHz) introduction
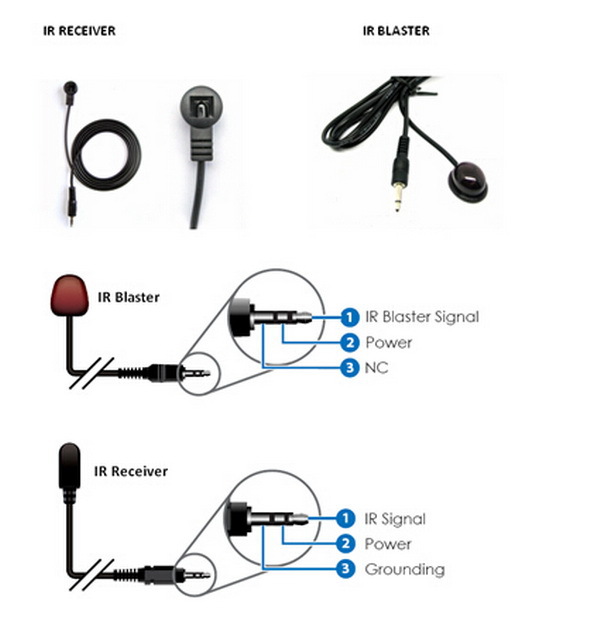
R BLASTER (TX)
To control the source: Plug IR Blaster into IR TX port of transmitter unit; place blaster in front of the IR eye of the source.
To control the display: Plug IR Blaster into IR TX port of receiver unit; place blaster in front of the IR eye of the display.
IR RECEIVER (RX)
To control the source: Plug IR Receiver into IR RX port of receiver unit; place receiver at or near display.
To control the display: Plug IR Receiver into IR RX port of transmitter unit; place receiver in position where it is able to receive remote signals.
VI. Application Example:
Member Information
| Shenzhen Videoconn Electronics Co., Ltd | |
|---|---|
| Country/Region: | Guang Dong - China |
| Business Nature: | Manufacturer |
| Phone: | +8613045867953 |
| Contact: | Phoenix (Sales Manager) |
| Last Online: | 02 Feb, 2015 |

