| Model: | 19JPC |
|---|---|
| Brand: | CSOIF |
| Origin: | Made In China |
| Category: | Industrial Supplies / Industrial Supplies Stocks |
| Label: | Tool Microscope , Tool Maker , Microscope |
| Price: |
¥98000
/ pc
|
| Min. Order: | 1 pc |
Product Description
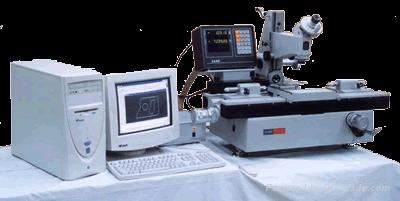
19JPC microcomputer-type all-purpose tool microcomputer is a new generation of all-purpose tool microcomputer used in computer assistant measure, which can solve each kind of complicated planar measuring problem. Traditional all-purpose tool microscope can not directly measure geometrical element in field of view, such as center of circle, midpoint, point of intersection, midline, and their distance, included angle and so on are hard to measure. But these are easy to do in 19JPC. This instrument adopts precise grating sensor, PC series and data interface gather to measure data, carry on data processing with 19JPC planar measuring program, display and print result. It is convenient to operate, only keying measuring command according to graphic menu displayed on screen. During the course of measuring, color display can timely display the coordination of collimated workpiece. Rectangular coordinate or polar coordinate may convert at any movement, which is especially convenient for measuring polar coordinate and cam. This instrument adopts metric system and British system. Calculating precision may reach 0.0001mm and 0.00001inch.It may self-correct assemble error of worktable track, further improving measuring precision.
Characters of instrument
Microcomputer-type all-purpose tool microscope adopts computer technology to carry on data processing to measured data on the base of digital all-purpose tool microcomputer 19JC. Equipped with double-beam interference stripe measuring method superior to the methods of image and axis-cutting, the performance of microcomputer-type all-purpose tool microcomputer is greatly improved. The combination and development of software enhance the system function, meeting customer''''s need in broader range. Microcomputer-type all-purpose tool microscope is a kind of multi-use measure instrument widely used in machinery, electron manufacturing, measuring and testing, also may be used to measure dimension, shape, angle and position of any part within measuring range.
Microcomputer-type all-purpose tool microscope adopts computer technology to carry on data processing to measured data on the base of digital all-purpose tool microcomputer 19JC. Equipped with double-beam interference stripe measuring method superior to the methods of image and axis-cutting, the performance of microcomputer-type all-purpose tool microcomputer is greatly improved. The combination and development of software enhance the system function, meeting customer''''s need in broader range. Microcomputer-type all-purpose tool microscope is a kind of multi-use measure instrument widely used in machinery, electron manufacturing, measuring and testing, also may be used to measure dimension, shape, angle and position of any part within measuring range.
Typical measuring objects:
Measure the shape of each kind of molding part, example: templet, templet vehicle cutter, templet milling cutter, die and cam.
Measure mid-diameter, small-diameter, screw distance, tooth-like DBC case of male screw (Screw plug guage, silk perch, worm, etc)
Measure leading distance, tooth-like and tooth-like DBC of gear hob.
Measure circuit board, drilling mold, or hole position of hole board, symmetry of key sit and other shape and position errors.
Main microscope is equipped with multi eyepieces and objectives, great field of view and clean imaging.
Adopt photoelectricity digital-display technology; take precise grating ruler as measuring component; adopting advanced computer technology, input timing length signal gathered by grating digital-display system into computer; special-purpose planar measuring soft carries on data processing, prints result or graph, correctly and effectively.
Main microscope may swing to left and right, used to measure screw part.
Take non-contact measuring as basic method, transmission and reflection illuminating, and examine part with complicated geometrical shape.
Complete accessories, broad use range.
Whole set of instrument
1. Mainframe: digital all-purpose tool microscope 19Jc
2. Planar data gather
3. Planar measuring computer operating system (software)
4. Micro-computer and printer
1. Mainframe: digital all-purpose tool microscope 19Jc
2. Planar data gather
3. Planar measuring computer operating system (software)
4. Micro-computer and printer
Planar measuring computer operating system (software)
Main function:
1. Basic measuring function: adopting WINDOWS interface, all operations are controlled by mouse, and may measure point, line, circle, arc, angle, beeline, roundness, gear, screw, cam, etc.
2. Calculating function: after measuring, figure graph of workpiece is displayed on computer screen; each kind of calculating is finished by mouse.
3. Graph editing function: amend figure graph of workpiece to produce new figure graph.
4. Printing function: all measuring result, calculating result and workpiece figure are all saved in computer in the form of file, transfering, editing and printing at any movement.
5. CAD interface: transfer AUTOCAD though CAD interface, fully using AUTOCAD function.
Main technical specification of all-purpose tool microscope
1. Measuring range and division value
X-Y-coordinate Measuring range 200×100㎜ Division value0.0005㎜
Collimation microscope Lifting distance:120mm
Arm of force inclining range: both 15°left and right Division value: 10′
Illumination grating adjusting range: φ3~φ32㎜ Division value:1㎜
Clinometer eyepiece Angle measuring range: 360° Division value: 1′
Figure eyepiece Angle measuring range: ±7° Division value:10′
Circulate arc reticle Curvature radius: R0.1~100㎜
Screw reticle Common screw distance t = 0.25 - 6㎜
Trapezia screw distance T = 2 - 20㎜
Optical indexing table Measuring range: 360° Division value:10″(projected value)
(Optional) Diameter of glass tableφ106㎜
Optical dividing head Measuring range: 360°Division value:1′
Optical localizer Diameter of measuring headφ3±0.1㎜
(Actual high-point diameter error can not more than 0.5μm.)
Measuring force 8 - 14g
Max. measuring depth 15㎜
Glass worktable Glass worktable dimension: 215×130㎜
Thimble bracket Max. clamping diameterφ100㎜
Max. clamping length: diameter of tested part≤ 55㎜, 750mm
diameter of tested part > 55㎜, 600mm
High thimble bracket Max. clamping diameter: φ180㎜
Max. clamping length: 600mm
V-type bracket: Left V-type bracket front and behind adjusting range: both 5mm front and behind.
Right V-type bracket upper and downward adjusting range: upper 15mm; downward 3mm
Max. carrying capacity:40kg
Optical parameter of collimation microscope
|
value of objective’s zoom multiple |
1×
|
3×
|
5×
|
|
|
Total zoom multiple
|
Clinometer or figure eyepiece
|
10×
|
30×
|
50×
|
|
Double-image eyepiece
|
15×
|
42×
|
65×
|
|
|
Field of view
|
Clinometer or figure eyepiece
|
φ20
|
φ6.6
|
φ4
|
|
Double-image eyepiece
|
φ13
|
φ4.7
|
φ3
|
|
|
Working distance
|
Clinometer or figure eyepiece
|
81
|
90
|
65
|
|
Double-image eyepiece
|
47
|
85
|
63
|
|
3. Instrument precision
Temperature requirement (1)Workroom temperature should be 20 ± 2 ℃.
(2)Workroom temperature change can not exceed 1 ℃ per hour.
(3)Tested part and instrument temperature difference can not exceed 0.5 ℃.
In the condition of meeting all temperature requirement, the instrument has the following guarantee:
(1)X-Y-coordination When using glass millimeter ruler to examine, the Max. un-precision of the instrument is;
0-level:(1 + L / 100)μm L: measuring length Unit: mm
When the ruler corrects according to correction table, X-direction can not be more than 0.0035㎜.
Y-direction can not be more than 0.0025.
(2) Clinometer eyepiece: Max. un-precision: not more than 1′.
(3) Double-image eyepiece: Instability of imaging: not more than 0.0005㎜
Incorrectness of imaging: not more than 0.001㎜.
(4)Optical dividing head: Max. un-precision: not more than 1′.
(5)Optical indexing table: Max. un-precision: not more than 30″(optional).
(6)Optical graduator: Instability of measuring: not more than 0.001㎜.
Incorrectness of measuring: not more than 0.0015㎜
Ⅳ Weight of instrument and overall dimension
Mainframe net weight: about 250kg
Overall dimension: (X × Y × Z):980 ×1020 ×640
Member Information
| Shanghai CSOIF Co., Ltd. | |
|---|---|
| Country/Region: | Shang Hai - China |
| Business Nature: | Manufacturer |
| Phone: | 18001902145 |
| Contact: | David Lee (Sales Manager) |
| Last Online: | 28 Aug, 2024 |


