| Model: | YS--6 |
|---|---|
| Brand: | West instrument measurement and control |
| Origin: | Made In China |
| Category: | Electronics & Electricity / Electronic Instrument / Pressure Gauge |
| Label: | Vacuum piston-type p , piston gauge , Pressure balance |
| Price: |
-
|
| Min. Order: | - |
Product Description
User’s Manual for Piston Pressure Gauge Model YS-6、60、250、600
ⅠApplications
Piston pressure gauge grade 0.05 (“pressure gauge” herein after) is used to inspect piston pressure gauge grade 0.2 and precision pressure gauge.
Ⅱ Operational Principle and Basic Structure
Operational principle of this pressure gauge is that pressure exerted on the piston surface by the weight of the piston itself and that of specific weight will be balance with the pressure produced in hydraulic container.
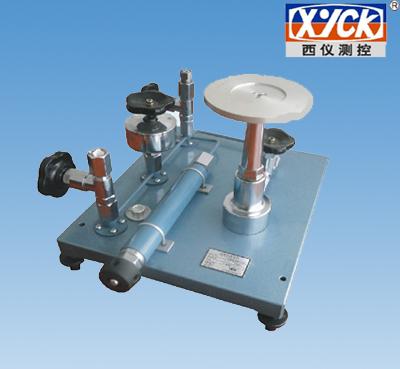
The pressure gauge is composed by two parts: testing pump and gauge system. Details please see the picture.
Testing pump includes hand pump (11)、oil cup (9) and two valves (6) and (7). There are two nuts installed at valve (6) and (7), which are used to connect precision gauge under test. Main part of the gauge system is a precisely finished piston with precision cross-section. This piston directly load the weight of the weights on the chassis.
Ⅲ Technical Data
Table 1
|
Accuracy |
Basic Errors |
|
|
When pressure is below the lower limit of test range |
When pressure is within the test range |
|
|
0.05 |
±0.05% of lower limit of test range |
±0.05% of the real pressure value |
Buoyancy force of bearing bar (include piston head) of YS-250、600 piston gauge immerging in the working fluid is 5.9g.
YS-6 piston pressure gauge:
Error “H” between the bottom of the piston and central liquid column of the gauge under test, when outer diameter of the gauge is Ø 150mm, H=109mm; when outer diameter of the gauge is Ø 250mm, H=169mm; modified formula is △P=Hγ, △P is hydrostatic column pressure difference and γ is the specific gravity of the transformer oil , γ=0.88g/cm2 .

1. weight 2. indicating board 3.base 4. adjusting screw 5. connecting vessel parts
6.7、8 valve 9. oil cup 10.level gauge 11.hand pump 12.hand wheel 13.gauge system
Table 2
|
Parameter |
Unit |
Pressure |
|
|
|
|
|
0.6MPa |
6 MPa |
25 MPa |
60MPa |
|||
|
Measuring Upper Limit |
MPa |
0.6 |
6 |
25 |
60 |
|
|
Measuring Lower Limit |
MPa |
0.04 |
0.1 |
0.5 |
1 |
|
|
Piston Standard Area |
m2 |
0.0001 |
0.00005 |
0.00002 |
0.00001 |
|
|
Base and Piston |
Standard Weight |
kg |
0.4 |
0.5 |
1 |
1 |
|
Pressure Produced |
MPa |
0.04 |
0.1 |
0.5 |
1 |
|
|
Specific Weight |
Standard Weight |
kg |
0.1;0.5 |
0.5;2.5 |
1;5 |
1;5 |
|
Pressure Produced |
MPa |
0.01;0.05 |
0.1;0.5 |
0.5;2.5 |
1;5 |
|
|
Quantity |
Pcs |
6;10 |
4;11 |
4;9 |
4;11 |
|
|
Double nuts |
|
M20×1.5 |
M20×1.5 |
M20×1.5 |
M20×1.5 |
|
|
Weight |
kg |
20 |
26 |
26 |
26 |
|
|
Working Fluid |
Mixed oil of transformer oil and kerosene at the temperature of 20 ℃: kinematic viscosity is 9~12mm2/s, acid value is no larger than 0.05mg KOH/g |
sebacic acid at the temperature of 20 ℃”: kinematic viscosity is 20~25mm2/s, acid value is no larger than 0.05mg KOH/g |
||||
Ⅳ Inspection and Storage
1. Upon receiving the packed pressure gauge, user should firstly check whether the package is in good condition or not. Should any broken found, user should immediately find out reasons.
2. Take off the underlay after unpacking the goods, check whether the appearance of the goods is in good state, whether the user’s manual and qualification certificate have been packed in. Should any discrepancies found, contact us immediately.
3. Pressure gauge should be stored indoors. Environment temperature should be within +5~+35℃. Relative humidity should be no more than 80%; there should be no detrimental substances which corrode the gauge in the air.
Ⅴ Installation and Operation
1. Gauge should be placed on the working table to facilitate operation. Use adjusting screw to calibrate level. Make sure to locate the bubble in the bubble level in the middle.
2. Working temperature of the pressure gauge is 20±2℃. No corrosive gas in the air.
3. Weight should be stored at a dry place.
4. Before using, clean every part of the gauge with oil. Then, inject pressure transmitting medium (no impurity substances and dirt in the pressure transmitting medium) in the inner cavity of hand pump and measuring system, excluding air from the inner cavity.
5. Revolve hand wheel of the hand pump to check whether oil circuit is open. Should no problem found, install the precision pressure gauge that is to be checked.
6. Operation Steps:
(1) Open oil cup (9), revolve hand wheel left to make the cylinder of the hand pump be filled with oil.
(2) Close oil cup (9), open valve (6)、(7) and (8), revolve hand wheel right to produce initial pressure and rise the base to align to the upper side of the indicating board. Details please see the picture.
(3) Increase weight to make it produce pressure inspection needs. When increasing weight, revolve hand wheel frequently to protect the basing from falling down. When operating, make sure the base and weight to circle counterclockwise at the initial angle velocity at not less than 30 r/min to overcome effects of friction.
(4) After checking, revolve the wheel left and load off the weight gradually. In the end, open the oil cup and load off all the weight.
7. As for the weight leaving factory, the real quantity of the base and piston is calculated according to standard acceleration of gravity. But when the difference between the acceleration of gravity of the place where pressure gauge is being used and the standard acceleration of gravity is more than 0.0005m/s2 , weight should be calibrated before taking into use. Weight of YS-6 and YS-60 after calibration is calculated according to the following formula:
 (1)
(1)
m- specific weight, weight of piston that has base device;
P-pressure measured (Pa);
A’-effective area (m2) of the piston
g-standard acceleration of gravity (9.80665 m/s2) when manufacturing. When it is calibrated at the place where it is used, “g” represents the local acceleration of gravity (m/s2).
ρa-air density (1.2kg/m3)
ρm-specific weight, material density of the base and piston (iron: 7.8×10³ kg/m3, aluminum: 2.7×10³ kg/m3 )
Weight of YS-250and YS-600 after calibration is calculated according to the following formula:
 (2)
(2)
Mj- mass of the weight gradually loading at the jth time, kg;
Pj-under the reference temperature and standard acceleration of gravity, pressure produced when the jth piece of weight loaded on, Pa;
Ao’-under zero pressure and reference temperature, piston effective area of the piston pressure gauge that is under check, m2;
g- standard acceleration of gravity (9.80665 m/s2) when manufacturing. When it is calibrated at the place where it is used, “g” represents the local acceleration of gravity (m/s2)
λ- pressure deformation coefficient of piston and piston cylinder parts
j- subsequence of the weight being loaded on
β-deformation coefficient (Pa-1), β=2.8×10⁻¹² (Pa-1)
8. when operating temperature of the grade 0.05 pressure gauge exceeds 20±2℃, calibrate the pressure according to the following formula:
 (3)
(3)
P-pressure measured (Pa);
α1; α2-linear expansion coefficient of piston rod and piston cylinder material (copper: 0.0000167, iron: 0.0000105)
t-environment temperature (℃)
9. Operation of the pressure gauge: piston rod, base and weight should be of the same number when leaving factory, do not interchange.
Ⅵ Maintenance and Repairing
1. Piston rod and piston cylinder are precision parts, they could not be disassembled randomly. Other parts should be cleaned periodically. Take care when cleaning and installing to prevent the gauge from dirt and wiper fiber.
2. Oil should be filtered, no impurity substances or dirt allowed. After taking into use for some time, oil should be replaced.
3. Put dust cover on the gauge while not being used to prevent it from dust.
4. Send it for calibration every one year.
5. Pressure gauge is equipped with 5 pieces of cup leather. When the pumping hole gives away, loosen the clamp nut, wind the hand wheel counterclockwise to back out the screw. Take off old piston parts, replace the cup leather. Cup leather replaced can revolve flexibly at radial direction.
Ⅶ Ordering Instruction
Order with notes: model, descriptions of goods, accuracy class.
Notes: 1MPa=106Pa; 1m2=104 cm2
Member Information
| Shaanxi Xiyi Measurement & Control Technology Co., Ltd | |
|---|---|
| Country/Region: | Shaan Xi - China |
| Business Nature: | Manufacturer |
| Phone: | 18192103685 |
| Contact: | Zhu Wei (regional manager) |
| Last Online: | 30 Nov, 2023 |
Related Products of this Company


