| Model: | WK-100S |
|---|---|
| Brand: | WINCOO |
| Origin: | Made In China |
| Category: | Industrial Supplies / Machinery / Welding Machinery |
| Label: | welding tractor , welding carraige , tank welding machine |
| Price: |
US $3150
/ pc
|
| Min. Order: | 1 pc |
Product Description
Product features
I. Welding features
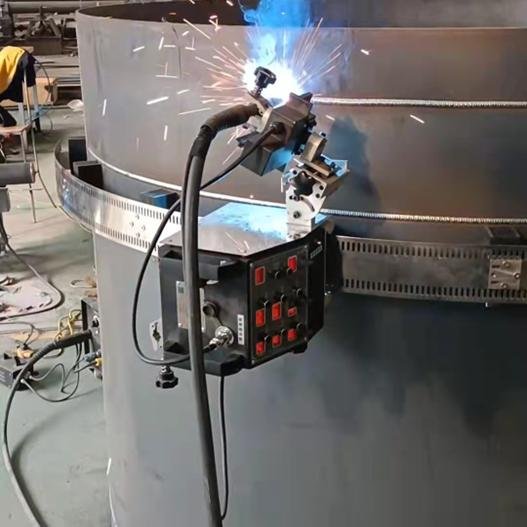
Equipped with 5 kinds of welding handling techniques, perfect simulation of manual handling, uniform appearance of welding seam, faster and more stable.
Weld width 0-30mm wide range adjustment, can adapt to all kinds of thin plate, thick plate welding.
Weld width 0-30mm wide range adjustment, can adapt to all kinds of thin plate, thick plate welding.
The machine can realize all kinds of distance discontinuous welding, length and speed can be adjusted at will.
The machine can demonstrate welding trajectory without ignition, convenient and intuitive.
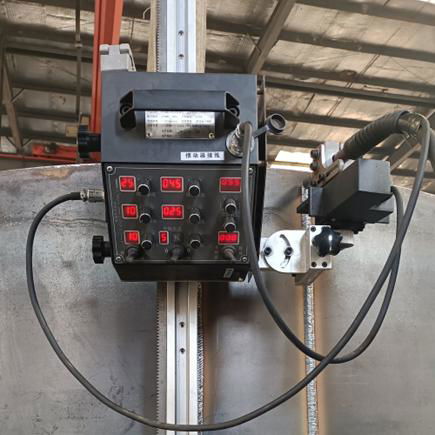
Control panel is full digital display, easy to adjust and record data, with memory function, automatic recovery of the last data when the next use.
Automatic stop after welding, limited stop contact is set in the two running directions of the machine, contact point is placed at the end of the weld in advance, automatic stop at the point to prevent over-welding.
II. Product designed features
The sliding track of the machine adopts the linear track specially used for advanced machine tools, which has zero clearance operation, smooth running, no stuck, no deformation, and higher integrity of the machine.
All directions of the machine are adjusted by high precision screw pitch, faster, more stable and more accurate.
All the parts are processed by advanced CNC machine tools, which greatly improve the accuracy and durability.
The whole high temperature spraying process + aluminum oxidation, so that the overall appearance of the machine to a higher level.
Equipped with special robot welding gun, welding quality is better and more stable.
III. Product overall using features
The machine is integrated design, easy to use, while reducing all kinds of messy external control lines, effectively prevent damage to the line and control, make the working environment more concise.
The lengthened magnetic seat on the track reduces the weight and number of switches with the same suction force, making it easy to install even for a woman.
The design of the special connecting plate for the track end is noteworthy. The bolt is used in the forward direction, which can connect two or more tracks into a longer whole. Bolt reverse use, can make the track fast, accurate lap, so that the length of infinite cycle.
Machine drive and control all adopt AC 20V voltage, more safe.
The professional welding gun used by this machine can be adapted to different welding gun joints, no matter you are using Panasonic welding machine or other welding machine, can be used perfectly.
The machine comes with toolbox is our company's original creation. The tool box is easy to use and durable. Some necessary small tools are stored in the tool box, which can reduce the time for users to search for tools and improve work efficiency. It is equipped with: fuse, welding gun conductive nozzle, all kinds of inner square Angle wrench, box ruler, notepad, pen, etc. When a perfect weld is adjusted, the weld parameters, the voltage and current of the welding machine and various parameters on the control panel of the machine are recorded. When the same weld is encountered next time, input parameters and perfect copy of the weld.
Flexible and convenient to use, non-welder can weld a perfect weld, one person can operate more than one machine at the same time, greatly reduce labor costs, improve the quality of weld, improve work efficiency.
|
Items |
Parameter |
Note |
|
|
|
Straight rail type |
Flexible rail type |
|
|
External power source |
AC 220V 50/60 Hz |
Three-hole |
|
|
Working power source |
AC 20V |
Use of each driver |
|
|
Dimensions |
245x520*280cm |
245x520x290cm |
Length x width x height |
|
Weight |
8.6kg |
10.4kg |
Main engine |
|
Track type |
Linear motion guide |
Self-aligning flexible slide rails |
|
|
Drive mode |
Gear drive |
Sprocket drive |
|
|
Welding speed |
0~1650mm/min |
Fastest |
|
|
The thinnest adsorption plate thickness |
3mm |
Magnetically attractive metal |
|
|
Welding gun adjustment range |
65mm |
Inching for up and down |
|
|
80mm |
Inching for left and right |
||
|
+ 60 |
Swinging angle |
||
|
+ 25 |
Marching Angle |
||
|
Stop left, stop right |
Swinging form |
||
|
Operating function |
0-100mm/min |
Swinging speed |
|
|
0-2.5s |
Left and right residence time |
||
|
+14mm |
Swinging width |
||
|
+5mm |
Center for compensation |
||
Welding procedure
Straight rails track:
Step 1: Use 6 M4X12 hexagon socket screw to install 3 sets of magnet seats on the track. Note that the magnet handle is in the rack direction. The track is assembled. Another set of tracks can be overlapped on the end connecting plate and used indefinitely.
Step 2: Install the welding robot host on a track from one end of the track, pay attention to the walking clutch in the open position. The clutch is in the closed position when used.
Flexible rails track:
Step 1: Mount 3 sets of magnets to 3 magnet positions in the middle of the track using 12 M6X16 flat head bolts. Tighten.
Step 2: Release the track clutch, install the welding robot on the track, close the clutch, and the host can slide on the track. Release or close the walking clutch, the main engine can run normally when in use.
Step 3:Install the pressing plate, ultra-thin flat pad and soft rail on the magnet aluminum block with 3 M6X16 flat bolts in turn, tighten and assemble the track. Another set of track ends can be inserted under the platenfor infinite circulation.
Step 4:Adjust the external auxiliary to a reasonable height, the external auxiliary has been sliding on the welding gun to support during welding, can effectively prevent the welding gun high and low or shake.
|
straight rail installation |
flexible rail installation |
|||
|
|
|
|
||
|
Use six M4*12 hex socket bolts to install three sets of magnet seats on the track. Note that the magnet handle is in the direction of the magnetic strip. The track is assembled. Another set of tracks can be connected to the end connecting plate for endless circulation use |
Install the three sets of magnets on the three magnet positions in the middle of the track with 12 M6*16 flat head bolts and tighten them. |
Release the track clutch, install the welding robot on the track, close the clutch, and the host can walk normally when in use. |
||
|
|
|
|
||
|
Install the welding robot from one end of the track to a track. Note that the walking clutch is in the open position. The clutch is in the closed position when used. |
Install the pressing plate, ultra-thin flat pad and soft rail on the magnet aluminum block with three M6*16 flat bolts in turn, tighten and assemble the track. Another set of track ends can be inserted under the platen for wireless circulation. |
Adjust the external auxiliary to a reasonable height, and keep sliding support on the welding parts during welding, which can effectively prevent welding gun height or shake. |
||
|
Common installation |
||||
|
|
|
|
|
|
|
Attach the torch to the clip and tighten it. |
Attach the torch to the clip and tighten it. Install the welding control wire (gun end) here and tighten it |
Install the welding handle control cable (tail) on the power box (left), install the wire feeder control cable on the power box (right), and tighten it. |
Non - Matsushita silk feeder solution Strip the 2 wires of the wire feeder control welding handle, screw or weld the conversion joint to the original control line, stick the insulation tape, install the wire feeder control plug on the power supply box to the conversion joint, perfect solution. The power plug of the power box is connected to AC220V 50/60Hz power supply for use. Note: Users should pay attention to self-distribution protection. |
|
|
|
|
|
||
|
Install the oscillator control line here and tighten it. |
Install the welding wire on the wire card, pay attention to the oscillation of the wire wiggler leave enough disturbance space, otherwise it will affect the wire and damage the wiggler. |
Install the plug of the wire feeder control line and the two press holes at the end of the welding handle to the wire feeder (Panasonic) and tighten it. |
||
|
Supply scope |
||||
|
SN |
Name |
Configuration |
Qty |
Remarks |
|
1 |
Machine body |
Moving system |
1Set |
Drive to travel |
|
Oscillator |
1Set |
swing |
||
|
Control system |
1Set |
|
||
|
Travel switch |
2Set |
Automatically stop welding at specified position |
||
|
2 |
|
Flexible rail/tracks |
2pcs |
1.5m *2 set |
|
The magnet holder |
8Set |
4Set/ pcs |
||
|
3 |
Welding power |
|
1Set |
AC220V to AC20V |
|
4 |
Welding power source |
|
1 SET |
Including 5 meter control cable 1.5 ground cable, 3 meter welding cable and gun holder,and welding torch, wire feeder and gas meter |
|
5 |
Welding cable and gun holder |
5 meter |
1Set |
|
|
6 |
Spare parts |
fuse |
5Pccs |
1A |
|
Conductive nozzle of welding torch |
2 Pccs |
Φ1.0、Φ1.4with each one |
||
|
7 |
Toolkit |
Hexagon socket wrench |
4 Pccs |
Size 3、4、5、6each one |
|
Qualification certificate |
1 Pccs |
|
||
|
Instruction |
1 Pccs |
|
||
Member Information
| WINCOO ENGINEERING LTD.,CO | |
|---|---|
| Country/Region: | Jiang Su - China |
| Business Nature: | Trading Company |
| Phone: | 15366132650 |
| Contact: | Mucyo (sales departments) |
| Last Online: | 12 Jul, 2022 |
Related Products of this Company
-
Tank welding machine tank construction
US $3200
-
Tank welding machine tank construction
US $25000
-
TIG Pipe Welding Equipment
US $25000
-
Orbital welding machine for small tubes
US $8000
-
200A Mini Welding Machine and MMA
US $35
-
Tank welding machine tank construction
US $25000
-
TIG 200 ARC WELDING MACHINE
US $135
-
mig 200A gasless welder MIG TIG MMA with
US $86
-
WSME-200 380V 200A TIG Welders TIG and
US $310
-
LGK-50 built-in air compressor plasma
US $290
